Sunday, Jul 12 8:57:26 MST 2026
Meshcore Upgrades
So I've been playing with meshcore pretty seriously for about a year now and have taken a deepr plunge and have now raised a tower and put up a repeater with a newly upgraded antenna and boy what an improvement an antenna can make!
The tower isn't much, just some thick wall rigid conduit in the ground, but it get's everything over the rooftop and hills around for quite a distance, so I'm pleased with it and don't think the neighbors will be too upset.
The main improvement came from the FG9026 antenna (digikey link here) it improved my noise floor by -8dB which is about 6.3x lower noise power, a great improvement!
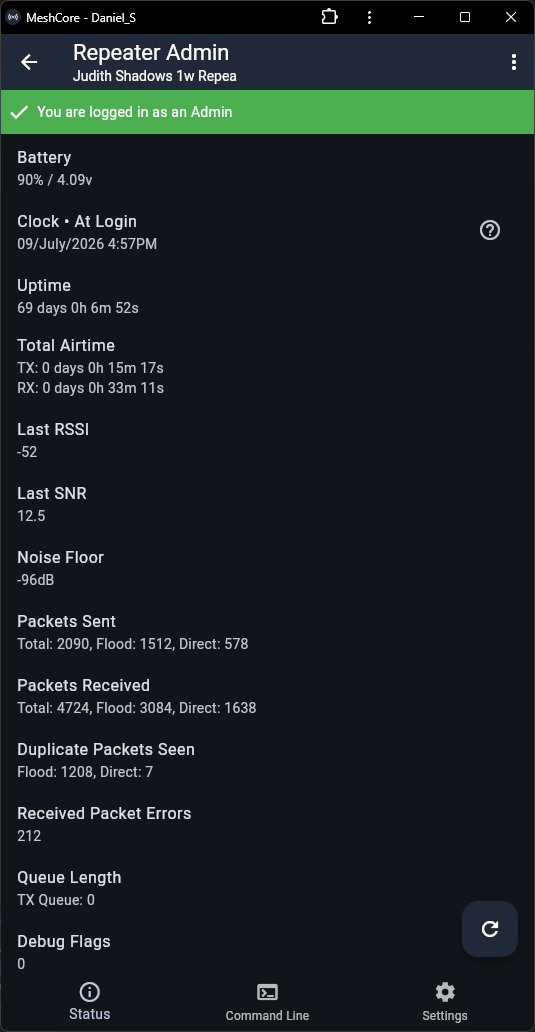
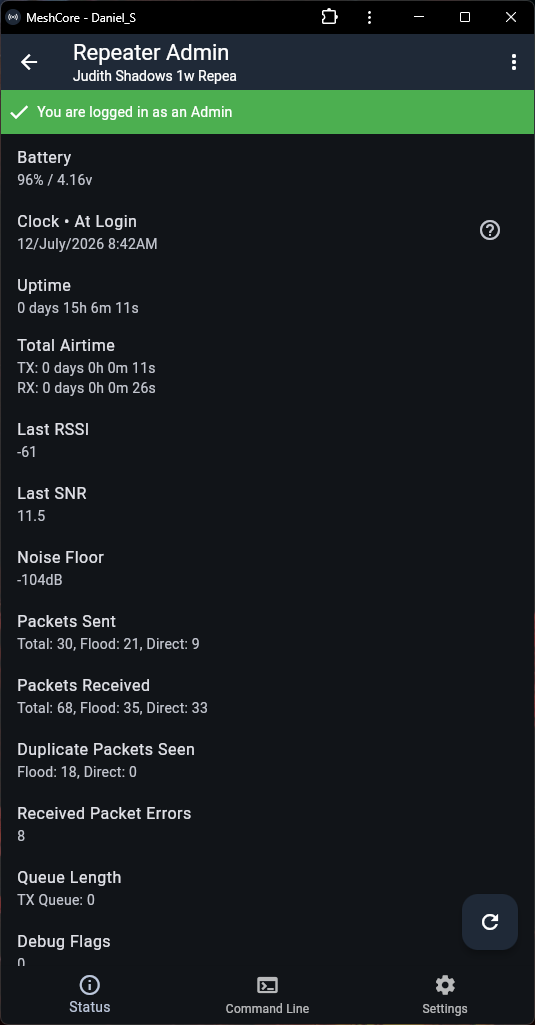
Being such a low power communication method I should now be able to hear things 6.3 times weaker than before (that could be 20-40% more distance), and out here in rural Montana, that matters!

Tuesday, Dec 13 10:41:43 MST 2022
Star Citizen Referral
With Luminalia rewards being what they are, let's get a free ship together! Plus you'll also get an additional 5000 auec starting credits!
Just enter in my referral code when signing up and buying your starter package:
STAR-TNF3-4TLHAnd if you wanted to check me or the org's I belong to on the verse, find me here: DarkSpaceDan
Tuesday, Feb 01 15:21:17 CST 2022
RUST IS COMING BACK!
Well that last minecraft server was fun! Quite some power gen at the end!
But it's time to move on, and move on we have! Rust is back baby!
Similary to before, and more info to follow, but just know, the server is live (search modded for "ITTM" or enter in the F1 conssole: client connect rust.italktomachines.com:28406
Join the new Discord: https://discord.gg/fhTxxtxwyK
Wed Dec 07 21:22:32 CST 2021
Oceanblock Minecraft Server
Wow almost a year since the previous minecraft server?!
Let's fix that in time for holiday breaks!
It's time for some Oceanblock 1.16! so if you don't already have it, grab the Feed The Beast launcher from their official site.
Grab the RELEASE version of Oceanblock (not the beta versions) this goes for the additional mods for 1.16 minecraft to follow.
Once it's installed; under the "Mods" tab; let's add 4 more mods.
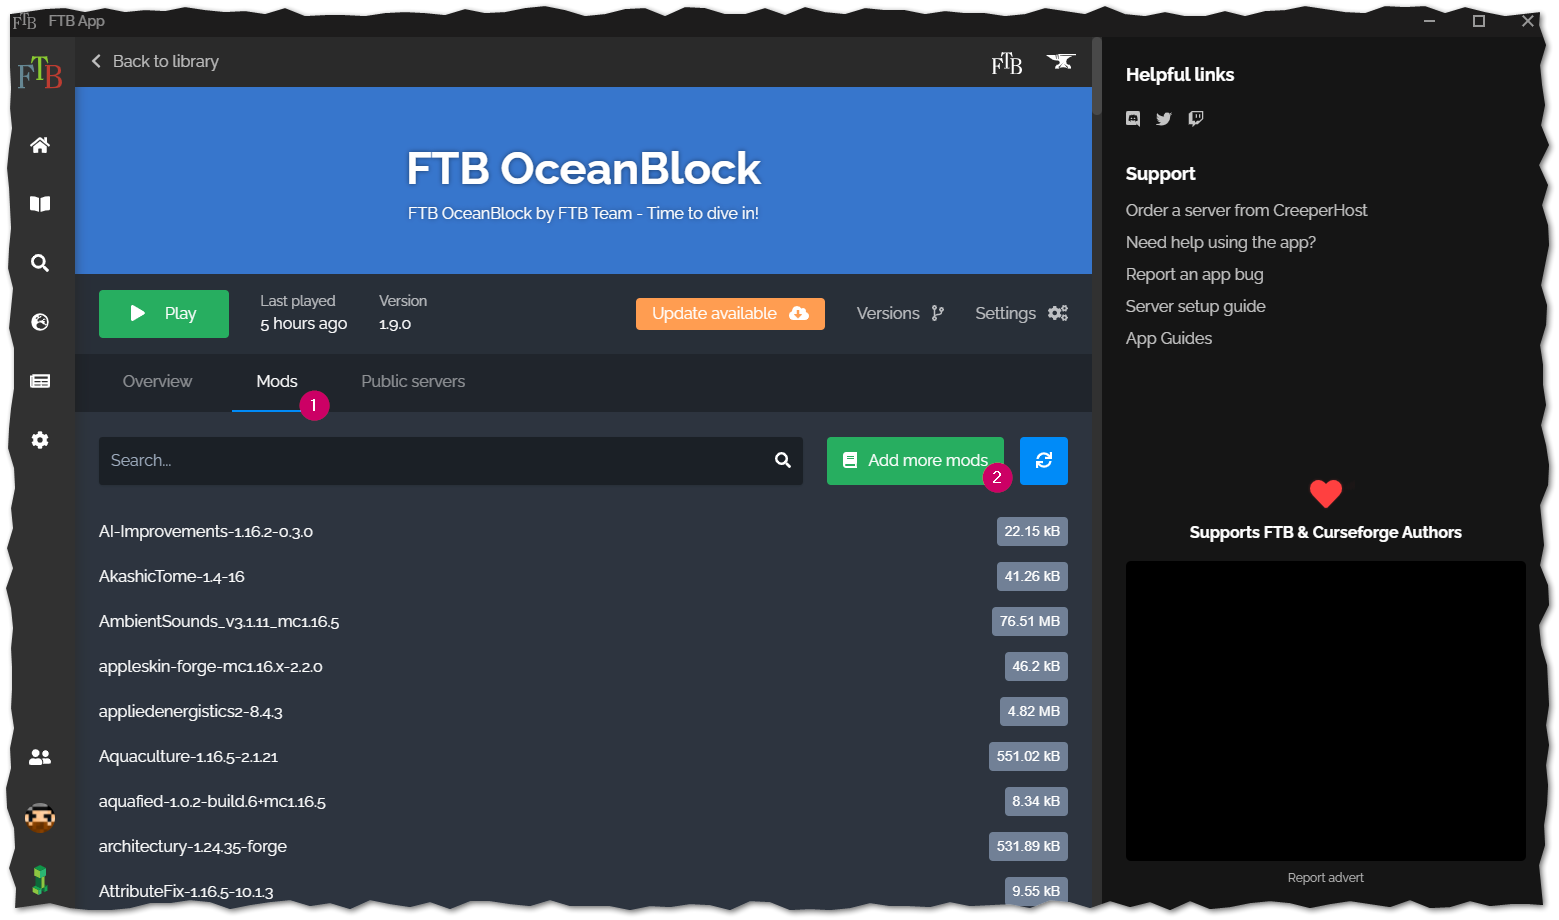
- Aquaculture 2
- Adds more fish and better (imho) fishing, and we're in the freaking ocean!
- Spice of Life: Carrot Edition
- Honestly kinda supprised they didn't include this by default! If you're going to have cooking mods, there should be a perk to actually cooking!
- Creative Wireless Transmitter
- Lets be real, we're going to be doing some traveling, and 48 blocks just isn't going to cut it on this server!
- Sophisticated Backpacks
- Ok, this one is just personal preference... there were already backpacks in this modpack. These are better.
That should be it, hit play and wait 5 minutes or so while this loads... it's not small.
Finally under the MultiPlayer setting, add a server, Name it whatever you like. For the server url use
oceanblock.italktomachines.com
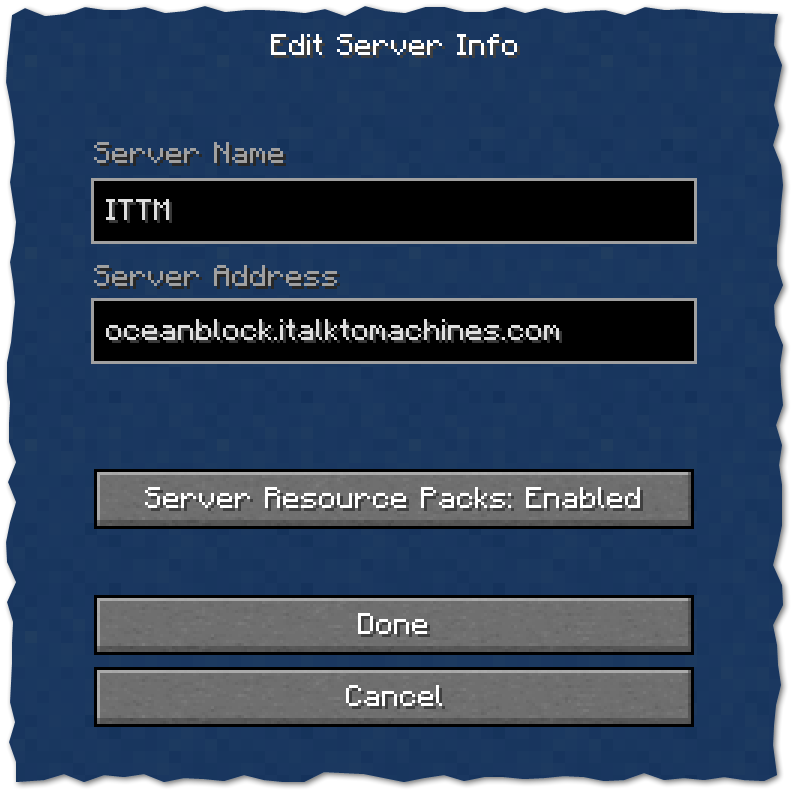
You'll spawn on our spawn platform and have instructions on how to get you're very own island adventure started!
*hint you type in
/ftbteamislands create Help me decide for voice chat!
mumble running at the same domain (quick join here)
discord which you can join here or below. Let me know your preference!
I might also have free gifts for those that join the server before the new year! ;)
(yes we have patched for the log4j vuln!)
Welcome!
Monday Jan 18 11:40:23 PDT 2021
Minecraft Server Joining HowTo
I figured with all the changes I'd just write up a quick howto on joining my minecraft server
First you'll need to have the curseforge on overwolf app installed. You can grab their official client here: https://curseforge.overwolf.com.
Next grab the exported profile I've created here: Latest Modpack Export and save it to your computer.
Open the curseforge app if you haven't yet and click on "Create a new profile" next to the search bar, and click the "Import" option and select the zip file you just downloaded.
This should start the creation of your new modded minecraft profile and get you all the needed mods to be able to join our server.
Before you start, this is a VERY heavily modded version of minecraft, based on "All The Mods 6" so we recommend you dedicate at least 8gb of memory to this version for best experience.
You can do that by opening the "Profile Options" and dragging the memory slider out past the 8000 mark.
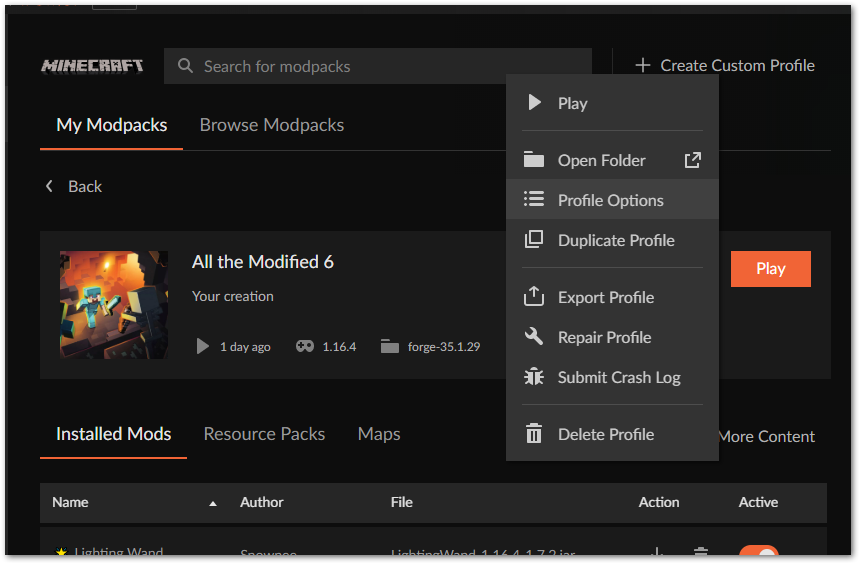
Then go ahead and hit play! Expect this to take several minutes to load. Again there's a LOT of mods in this pack, so there will be a long loading time.
Our server does employ the whitelist, so you will need to have been granted access before connecting to our server, please email daniel (address on contact tab above) with your minecraft username (and if you know how, the UUID as well will really help!)
Finally click the "Multiplayer" option, enter in minecraft.italktomachines.com as the server address. Again, on the "Loading Terrain" screen expect this to take a few minutes. There's many dimensions and alot of resources to load up. Be Patient! Then Enjoy!
Fri Jan 01 18:13:44 PDT 2021
HAPPY NEW YEAR, And New SERVER!
So I'm preparing to move halfway across the country, and I don't want to have my minecraft server up and down as it's been hosted in my office since it's start.
So I've rented a Creeperhost server and I've built out a new Modpack using 1.16.4! It's got alot of new mods to explore so get your Travlers Backpack and prepare to go exploring!
The current ModList is found here: modlist.html Profile for your Curseforge Client is here: ABMinecraft-0.1.2.zip sha1:304e53adfc3188fb227548688ed44c6e60423ded
As you would expect it is a whitelist server, but most are welcome! So join us at minecraft.italktomachines.com in your server list!
What to expect from this modpack; Well I've been chatting in the MineTogether Chat (included in this pack) and notice alot of questions on how or what to pick, so some of those decisions I've already made for you. Like choosing between Refined Storage or AE2, or what power gen to use. Refined storage has been picked for this server and we've removed AE2 just to keep things more lightweight.
But we also have been having alot of fun with all of the new mods taking the stage in 1.16 forge, like tetra instead of tinkers construct. Eidolon for Magic (theres a fair bit of magic mods in here) and we REALLY love the atmosphere of the UnderGarden, it's a great setting for sacrificing to your new Dark Lord!
Really just give it a shot, give us some feedback and enjoy! ABMinecraft!
Sat May 31 21:31:33 PDT 2020
How to connect using OpenComputers
Yes you can connect to our chat network from inside our modded minecraft server using OpenComputers!
We wanted to keep the main chat absent from the irc chat (we've been there before) but of course you can opt in to the chat by setting up OpenComputers to connect to our IRC server!
In the below video we cover 2 different ways to connect, one using wocchat from the oppm repository (more like weechat); and how to join using the OpenIRC disk provided by the OpenComputers Devs (more like irssi).
Both work great, and both will require the internet card.
Wed May 27 17:12:48 PDT 2020
Fully Unreal 5!
So Unreal IRCD has made version 5 their new stable and main-line irc daemon, and we've fully upgraded!
So yes, as more irc3 commands are made available they will be implemented as we grow!
Services are also updated so we are as bleeding edge as we can be currently, and hope to stay that way, of course any issues or concerns you notice with the services or connections please do continue to let us know!
Thanks!
Ammended, we've updated again due to a security reported 2 days later... all up to date again!
Fri Jan 11 14:23:14 PDT 2019
Rust Server Online Again!
I got tired of playing on other servers (read, not being able to abuse admin privs and also mess with my members) I decided to stop hosting my minecraft server and instead go back to Rust!
I have been watching so many youtube videos of gameplay, I just missed it, and it can be a casual game (especially when your server is brand new and has no other people playing on it.) but farming's boring, so I figured it had to be at least a 2x server. I played on some random 2x server (that spammed you constantly and I hate that) but still had to do too much farming, and also there was no stack changes, so boxes filled up fast. To fix that I have upped my servers limits for most stackable items and went up to 4x. Life is better!
Now you just need to join and have some fun with us! The link above has all the details you could need! Come and play!
Tue Jan 31 17:32:25 PDT 2017
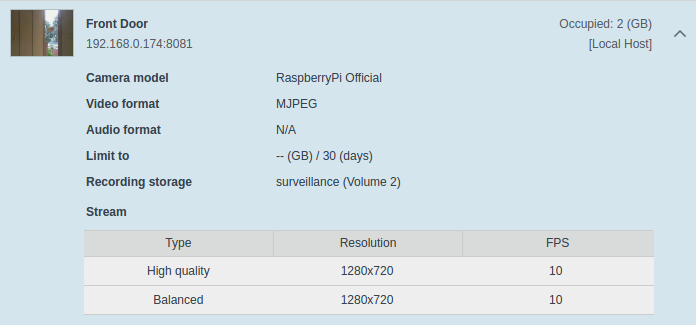
Getting your official raspberry pi camera working on the Synology Surveillance Station v8.0
For reference, I'm using an official raspberry pi camera on a raspberry pi 3 running the motioneyeos found here.
Get your pi up and running on your network, update the UI to allow "expert settings" and make sure to check the option for "Fast Network Camera" is set to "ON".
I also go ahead and disable samba, ftp, motion detection etc as all I really want is the network stream, the synology will be doing the rest of the work. Let it reboot and you should be good to go.
Next is a bit more tricky, on your synology you'll need to have SSH enabled access. Log in and cd over to in my case /volume2/@appstore/SurveillanceStation/device_pack (yours might be on /volume1/.. or /volume3/.. etc.
Create a new file named RaspberryPi.conf and enter in the following text:
[RaspberryPi*Official]
api = rpi1
channel_list = 1
default_channel = 1
resolutions_mjpeg = 640x480, 800x600, 1024x576, 1024x768, 1280x720
fps_mjpeg_[640x480, 800x600, 1024x576, 1024x768, 1280x720] = 1-20
default_image_quality = 5
mjpeg = http
motion = mjpeg
default_username = user
default_password = blank
Then stop and start the surveillance station from the synology control panel.
Now when you go back to the surveillance station you will have a camera brand and model for the official raspberry pi camera working!
Set your IP accordingly, set your port to 8081 and your username to "user" and clear out the password, test the connection and enjoy!
Tue Sep 20 13:29:19 PDT 2016
How to setup wifi on your SoC pc be it raspberry pi, orange pi, odroid etc. using wpa_supplicant the RIGHT way!
Why is this the right way? Well quite simply it removes the cleartext of your password from the config file. Also yes I'm aware that it's pretty trivial to deauth and generate alot of traffic and sniff the password right out of the air these days. That still requires local proximity to the network, so there's still an argument to obfuscate your configs as much as possible.
First we are going to list our wireless devices, iwconfig works, but there's actually iw that does the job easier
sudo iw devSee? Isn't that a nice easy to read output?!
Assuming you have a wireless device above, you'll need to scan for your wireless access point's name, odd's are good you already know what it's called and can skip this, but not everyone does so I'm posting this to be complete. Replace wlan0 below with whatever the device's name was above.
sudo iwlist wlan0 scanThis next step will require root though, sudo isn't enough so we'll enter the next 2 commands
sudo su
wpa_passphrase SSID >> /etc/wpa_supplicant.conf
Replaceing your Access Point's name for the SSID above. Use quotes if there are spaces in the SSID "like so".
This will return you to a blank line. It's waiting for you to type in your Pre Shared Key (PSK) or the password to your wifi, just enter it on this line and press enter.
Now if you check your /etc/wpa_supplicant/wpa_supplicant.conf file you'll see you have your PSK entered and commented out, using a hashed version of it below instead. If your parinoid about computer security like myself, you'll want to delete this line and just leave the hashed version. It should work just fine.
Now you should be good to cycle your wireless card and get connected! Easy enough, just enter the following and you should be up and running! (or just reboot)
sudo ifdown wlan0
sudo ifup wlan0
Give it a few seconds to connect and check you should see you all connected
pi@demo:~ $ iw dev
phy#0
  Interface wlan0
    ifindex 3
    wdev 0x1
    addr 7c:dd:90:8d:e1:38
    ssid Flaming Unicorns
    type managed
Sat Sep 3 01:14:40 PDT 2016
Just a sample of some blog stuff
Really this is just a test to figure out some formatting items, and to play with highlight.js to make sure it works, as well as to make it fit my theme just a little bit better.
Another paragraph with not really alot of content, but I guess I should try one of my all too common long run on sentences that are overly detailed for no real reason other then I am really trying to describe my point of view with as little discrepencies or mis-understanding as possible.
Here's a very simple shell script to run on an AWS machine image (AMI) that has the splunk monitoring agent installed, prior to creating an image of it
#!/bin/bash

### Remove Sumo for Splunk Prep
USERNAME='root'

ME=`whoami`
 as_user() {
   if [ $ME == $USERNAME ] ; then
     bash -c "$1"
   else
     su - $USERNAME -c "$1"
   fi
 }

as_user "/opt/splunkforwarder/bin/splunk stop && /opt/splunkforwarder/bin/splunk clone-prep-clear-config"

exit 0
And a closing line just for tesing 'n stuff.